Sunday, February 22, 2015

How to save multiple faces from Game Character Hub to use in RPG maker VX Ace

Here I will show how to save 8 faces into the same file to read them later on RPG Maker VX Ace.

To make the 8 picture file:

  1. Open Game Character Hub
  2. Open Character generator
  3. choose Face RPG Maker VX Ace
  4. Choose the parameters you want.
  5. Set "Number of characters to generate" to 8
  6. Output format to .png
  7. Click on Frame mapping process.
  8. Click Add
  9. Click on all the "RPG Maker VX Ace Face (row ) that mention row (there are 8 of them)
  10. Click ok twice.
  11. Click Generate.
To load onto RPG Maker VX Ace
  1. press F10 (Resource Manager)
  2. go to Faces
  3. click import
  4. select your file
  5. close
  6. press F9 (Database)
  7. click on the face
  8. load :D

NOTE: this post is mostly for me to remember how i did it. Since I tend to forget things. So don't expect this to be a nice post.


Wednesday, May 28, 2014

Rendering tests in Apophysis 7X

I recently started using Apophysis 7X. Probably as many others before me, setting the parameters for rendering quality can be a challenge.

I'll keep this simple. Each test I made had only one variable changing. Each test shows what was changed, you will be the judge of what works best for you. Sometimes the difference is quite small, sometimes quite big. Check it out below.


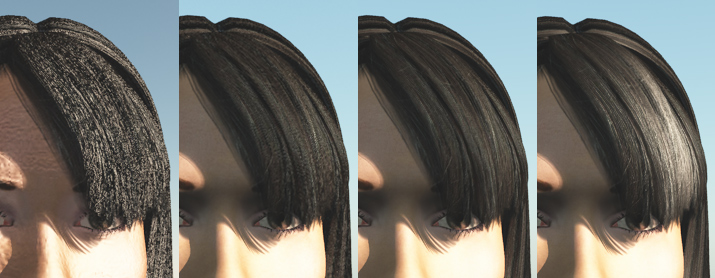
Test one, Filter Radius:
Tests included Filter Radius: 0.1, 0.2, 0.5, 0.9

Images were rendered at:
Size: 1024x768   Quality: 1000   Oversample: 2

Comparison between different filter radius settings.


Findings: 

  • The higher the filter radius value, the softer the edges of the lines will be. (0.9 being best)
  • Difference in time is minimal at the size tested (5 second difference between highest and lowest value)
  • Difference in -+0.1 is minimal. Make larger increases/decreases to notice a difference.

FILTER TESTS STATS

--- Rendering "Fae2-1-1000.jpg"" ---
  Size: 1024x768
  Quality: 1000
  Oversample: 2, Filter: 0.1
  Total time: 8 minute(s) 7.27 second(s)

--- Rendering "Fae2-2-1000.jpg"" ---
  Size: 1024x768
  Quality: 1000
  Oversample: 2, Filter: 0.2
  Total time: 8 minute(s) 10.52 second(s)

--- Rendering "Fae2-5-1000.jpg"" ---
  Size: 1024x768
  Quality: 1000
  Oversample: 2, Filter: 0.5
  Total time: 8 minute(s) 8.99 second(s)

--- Rendering "Fae2-9-1000.jpg"" ---
  Size: 1024x768
  Quality: 1000
  Oversample: 2, Filter: 0.9
  Total time: 8 minute(s) 12.63 second(s)

-------------------------------------------------------------------------------------------


Test two, Oversample:
Tests included Oversample: 1, 2, 3, 4

Images were rendered at:
Size: 1024x768   Quality: 1000   Filter: 0.5

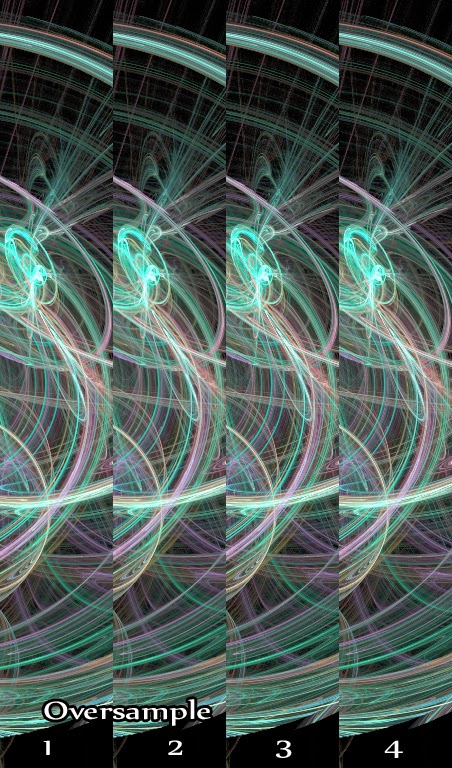
Comparison of oversample settings


Findings: 

  • The more oversample you have, the faster it renders (16 second faster between oversample 4 and 1)
  • *I* couldn't find much difference in image quality (at least under these test settings)
  • Needs to be tested in conjunction with another variable
OVERSAMPLE TESTS STATS

--- Rendering "Fae1-5-1000.jpg"" ---
  Size: 1024x768
  Quality: 1000
  Oversample: 1, Filter: 0.5
  Total time: 8 minute(s) 21.58 second(s)

--- Rendering "Fae2-5-1000.jpg"" ---
  Size: 1024x768
  Quality: 1000
  Oversample: 2, Filter: 0.5
  Total time: 8 minute(s) 8.99 second(s)

--- Rendering "Fae3-5-1000.jpg"" ---
  Size: 1024x768
  Quality: 1000
  Oversample: 3, Filter: 0.5
  Total time: 8 minute(s) 8.92 second(s)

--- Rendering "Fae4-5-1000.jpg"" ---
  Size: 1024x768
  Quality: 1000
  Oversample: 4, Filter: 0.5
  Total time: 8 minute(s) 5.18 second(s)

-------------------------------------------------------------------------------------------


Test three, Quality Density:
Tests included Quality Density: 200, 500, 1000, 2000, 4000

Images were rendered at:
Size: 1024x768   Oversample: 2   Filter: 0.5

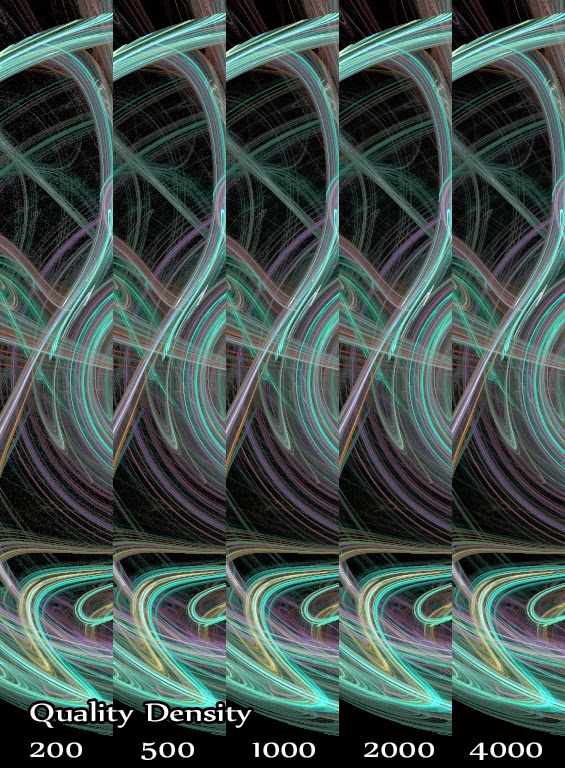
Comparisons between quality density values


Findings: 

  • Difference in quality density drastically affects time
  • It is most noticeable in dark areas with light flame strokes 
  • Difference between 2000 and 4000 (under these settings) is not that much, might be worth going 2000 to save time.

QUALITY  DENSITY TESTS STATS

--- Rendering "Fae2-5-200.jpg"" ---
  Size: 1024x768
  Quality: 200
  Oversample: 2, Filter: 0.5
  Total time: 1 minute(s) 39.83 second(s)

--- Rendering "Fae2-5-500.jpg"" ---
  Size: 1024x768
  Quality: 500
  Oversample: 2, Filter: 0.5
  Total time: 4 minute(s) 4.83 second(s)

--- Rendering "Fae2-5-1000.jpg"" ---
  Size: 1024x768
  Quality: 1000
  Oversample: 2, Filter: 0.5
  Total time: 8 minute(s) 8.99 second(s)

--- Rendering "Fae2-5-2000.jpg"" ---
  Size: 1024x768
  Quality: 2000
  Oversample: 2, Filter: 0.5
  Total time: 16 minute(s) 17.46 second(s)

--- Rendering "Fae2-5-4000.jpg"" ---
  Size: 1024x768
  Quality: 4000
  Oversample: 2, Filter: 0.5
  Total time: 32 minute(s) 30.84 second(s)

Tuesday, February 21, 2012

Wonderful Eye Material in Vue for DAZ Characters

This is yet another small tutorial I made for fixing materials in Vue from characters that come from DAZ.

Previously I've talked about how to fix the skin and hair materials. Now, with a bit of testing, I've come up with a good looking material that's easy to make and will give you great results. No need to purchase the eye editors for DAZ.

Some things to know:
The material I made is meant to reflect the actual scene, so it looks more natural.
Apply the material just to the CORNEA


Let's start:

You can start by selecting the Cornea material and loading the "Flat White", just completely ignore the material that came from DAZ.

On the Material Editor main tab, on the top left of the screen:

  • Make it [One sided] 
  • Click also on [Don't cast shadows]
  • Turn on [Disable caustics]
On the Highlights tab:
  • Make the [Highlight Color] something like RGB 185,192,216
  • Set [Highlight global Intensity] to 100%
  • Set [Highlight global size] to 80%
  • Set [Anisotropic highlighting] to 0%
On the Transparency tab:
  • Set [Global Transparency] to 80%
  • No [Blurred transparency]
  • [Refraction index] 1.0
  • [Flare intensity] 40%, span 10%

On reflections tab:

  • [Global Reflectivity] 30%
Now Rename your material and just save it! Use it again any time you bring a new character to Vue, just as simple as that!

Remember this is just how I made it, you can change it to suit your needs. This is the result I got:


**The scene was rendered with Global Radiosity.

Tuesday, February 14, 2012

Fixing HAMPTON hair in Vue imported from DAZ

There are a few fixes for hair and other materials that need to be made in order to have Vue render them correctly. In another post I made, I spoke of how to fix the skin texture, but in this case we'll just focus on the hair.

First we have to fix the materials for both the skin and the hair.
For the skin, check my post Fixing Skin in Vue imported from DAZ

**Remember that some of DAZ's hairs are different from others, The hair used here was the Hampton. You might need to change the Highlight and bump settings depending on your scene or the Hair Object that you use.

Fixing the Materials for the Hair
  • Lower the bump to 0.01
  • In [Highlights] tab: Put [Highlight global intensity] and [Highlight global size] to 100%
  • Make sure you have [Variable Highlight] checked.
  • Right click on  [Highlight production] and go to Edit Function. Link Highlight to your Texture map and set it to gray-scale.
Once the material is fixed, there are still some issues that need to be checked on render quality, for example rendering with the presets sometimes brings unexpected results (like transparencies showing weird shadows)

Fixing the Render Settings

How I set up my Render settings in [User Settings] is:
  • Advanced effects quality: 50%
In the [Anti-Aliasing] have both Object and texture checked and then click on the Edit button
  • I find that [object anti-aliasing] for the hair works best in [Systematic]
  • [Subrays per Pixel] Min 6, Max 16
  • [Quality Threshold] Contrast 50% and Geometry 0%
Render testings

How the quality of the image changes with the use of materials changes and render settings.
  1. The first Image is how it rendered [Final] just after import.
  2. Second is after all materials have fixed the bump.
  3. Third image is after fixing the render settings in [User Settings].
  4. Fourth is after adding the correct highlights to my hair.
This should already give you pretty good results, but there is still one more thing. 

For realism its best to use [Global Radiosity] in your [Atmosphere Editor] [Light ] Of course its not necesary and it depends on what your scene needs, but here are some before and afters:

Your Atmosphere will change drastically how your model looks.

Monday, February 13, 2012

Making and Saving Facial Expressions on DAZ


So, its always nice to buy something that is already made and gives you ease of use for your characters. But how about creating your OWN set of, for example, facial expressions! It's very easy! just a few simple steps:

1.- Setting up for creating and saving:
First just load any character that you want to make the facial expressions on (These expressions will work for any character tough, i simply chose the character that i'd like to see on the load icon for the expression)

Go to the [Posing / Shaping] tab. On the panel to the right, go to Parameters and then Pose controls.
For easy saving click on the two small arrows that will open the content library.

This is how my screen looks like
Having the tabs to the left will let you access the small [+] symbol for easy saving your pose
Set your character close to the screen so that when you save your pose you will have a good preview icon.

2.- Changing the Pose controls

Change and make the face as you want it. Adjust the sliders to create the facial expression of your choice

3.- Saving your Facial Expression

Once you are happy with how your face look, its easy to save for later use.

Go to the folder where you want to store your expressions (in my case Daz/Genesis/Poses/Faces)
Click on the [+] sign at the bottom left of the content library and click on [DSF Pose File ...]
Chose the save location (DAZ\People\Genesis\Poses\Faces)
choose a name, hit [Save] 

Then a DSF Pose Save Options screen appears. click on the Genesis (to deselect all) and then only select as shown here:

Saving your Facial Expression
By only choosing the pose controls and just the head you are assuring that your other characters wont turn into this one and still make the facial expression you wanted.

When you are done, an icon with your new facial expression will show on your library, double click on it to change your characters face.

I suggest you also save a "Neutral" face so you can reset the face at any time, for whatever reason.

And that's it! Happy facial expression making!!

Tuesday, January 24, 2012

Ivy generator!

Looking at one of FireKDragon's pictures, he mentioned an ivy generator he used for his wonderful image. I started to look into it and I found it. An easy to use external, small program that will generate an ivy plant around your object!

Heres the link to the page: http://graphics.uni-konstanz.de/~luft/ivy_generator/

And quoting Drea, I put the important Vue notes she made that I use:
All of her post can be found here: http://www.yurdigital.com/forum/software-forums/vue/ivy-generator-free-tool-boost-your-forest-ruins

In Material Editor:
  • If wanted, add bump map to the color map and 
  • set bump to 0.8
  • change highlight color to a light gray
  • add backlight between 95% and 100%
For textures I used a picture I took of a ivy in a trip to the UK. It is from the Lake district near Keswick. You are welcome to use them for free if you want. You should be able to right click and download the full size. In Vue I change the trunk texture into the mossy green or something else.


Friday, November 11, 2011

Render Batch in Vue

So, I wanted to test my theory that maybe by using Batch Render I could continue renders that I had previously started rendering and had a resume render save file.

It didnt work for me. I made a test scene where I rendered the image on normal screen render and took X time. I then started the render and halfway I stopped it, for the resume render to be tested on the Batch rendering. It came out with a Fail message and the picture just didnt render. With the Batch render screen open, I then clicked on add current where it seemed to render the picture in full from the begining. And it took the same time. So no resume render.

I know this is not properly tested but I wanted to post my findings somewhere for the mean time. if i figure something else, ill update this.

So  Things to remember:

  • Dont add to the batch a resume render as it will crash
  • Prepare scenes in advance and prepare them to save to disk
  • It continues rendering on the BG so you can still work on vue
  • Add an auto-save timer that suits your purpose
Thats that for now. To be updated once I gather more info.